
Correcting for web printing on newsprint (sometimes colloquially referred to as toilet paper by printers) can sometimes be pretty difficult.

Correcting for newsprint is a bit like playing darts. You can go without doing anything to your photos and some will get pretty close... but others will fall short, miss the floor and lodge themselves in someone's nether regions...
Here's a few basic, easy to follow tips that will get you a little closer to the bullseye:
1. Open your file, make sure it’s RGB, and sized: 150-200dpi
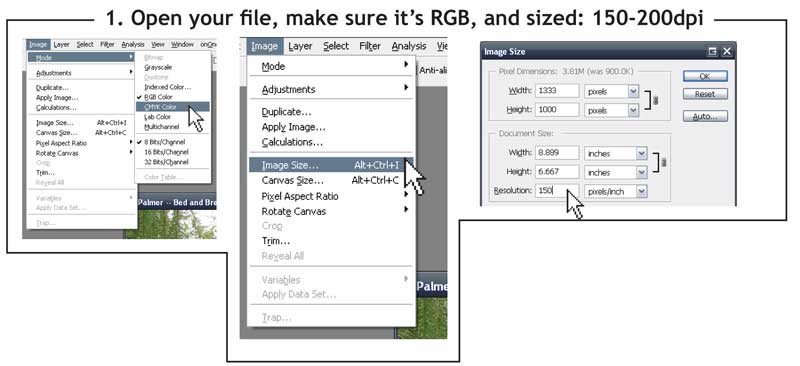
At this point, or any other point in processing (before sharpening) you can resize your image to approximate the size it’s going to be used in the publication.
Make sure to change the image resolution to 150 DPI (higher resolutions can be used, but do little to achieve higher quality on newsprint)
2. Correct for contrast with levels

B. Drag the black slider to the right (holding down the {ALT} key) until a little bit of the darkest parts of the photo show through.
C. Move the grey slider to the left until the photo is lighter. Aim for something a little brighter than you would normally, as everything darkens down on newsprint
3. Convert to CMYK
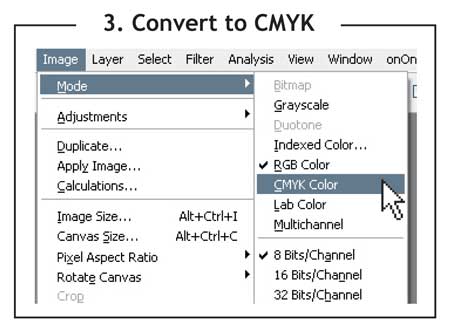
Really bright colors (Usually found in outdoor pictures of grass, sky or clothing) will be converted as best they can into the much smaller CMYK for newsprint color gamut. Those brighter colors will be lost, and can only be approximated as part of the conversion process.
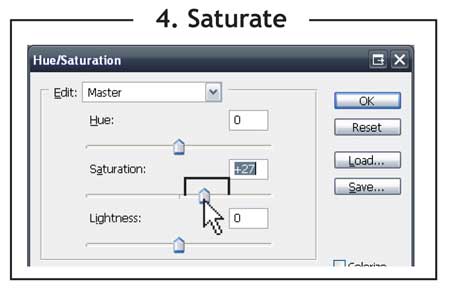
4. Saturate!
5. (Size) Sharpen and Save
If you haven’t sized your image yet, be sure and do so now (See step 1.)
All photos need to be sharpened on output as printing on newsprint will dull not only the colors, but the edges of detail within images. Use the unsharp masking filter (Menu: Filter->Sharpen->Unsharp mask...) to get some more detail back into the image.
Adjusting the sharpening to be right for each photo can be a bit of an art. Adjust the radius to 0.7 for most 150 DPI images, and then move the slider for amount to the desired level (usually above 100, and sometimes as much as 500). For 90% of sharpening, the threshold slider should be set and left at 0.
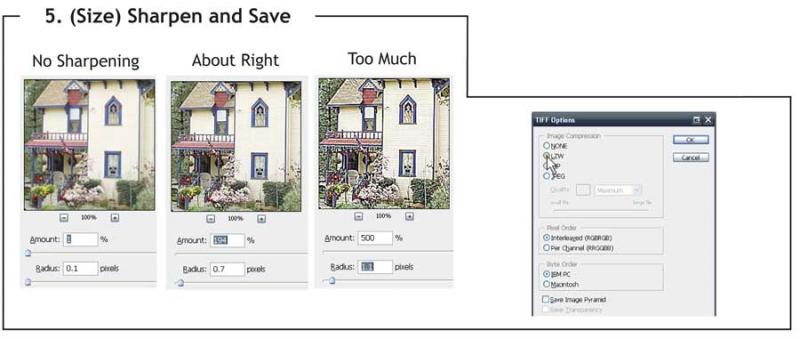
Once sharpened, your image is ready to save out as a TIF or PSD.
TIF is a lossless format (similar to PSD) that will save everything a photoshop PSD will save (Except transparency for other programs).
When saving a TIF, be sure and use one of it’s included compression settings. LZW is safest and works with almost all page layout programs.
Your Saved TIF contains all the embedded CMYK profile data to look as it should, everywhere it is honored.